Once upon a time, there was a kingdom called Data Land ruled by a king named MadSecurity. The King loved his subjects dearly and wanted to make sure they had access to all the data in his kingdom. ‘Let there be access for all!’, he proclaimed. And so, every user was granted access to every piece of data in the kingdom. Despite MadSecurity King good intentions, chaos ensued in Data Land. Data was being accessed and modified by unauthorized users, resulting in breaches of privacy and security. The once-happy kingdom was now riddled with data-related problems and it turned out, this fairy tale ending was not so happy after all. So, let’s explore the right way to grant access to data and ensure that our kingdom remains secure and prosperous.

Databricks - Securing access to Data Lake
In the era of big data, organizations are increasingly turning to data lakes as a way to store and manage massive amounts of data. And when it comes to process data, Databricks has emerged as a popular choice for many businesses. Setting up a data lake connection on Databricks is a relatively straightforward process, but things can get more complicated when it comes to managing access to the underlying data stored in the Data Lake Storage (like azure data lake or S3) used by Databricks. In particular, controlling access among different groups of users can be a challenge. In this blog, we’ll explore how to grant access to ADLS among groups in Databricks, so you can ensure that your data is secure and accessible only to those who need it.
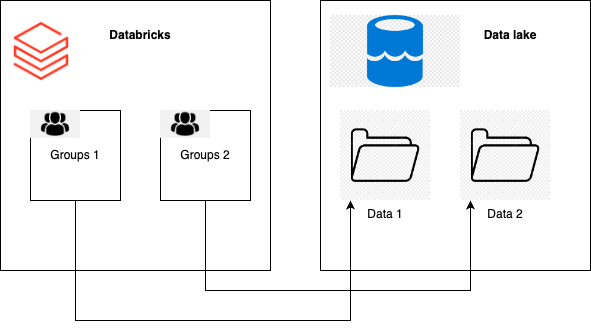
In particular, in this example, we have 2 groups defined in databricks and two containers (or folders) inside the ADLS. Our goal is to grant GROUP1 only access to container Data1 and access to GROUP2 to only container DATA2.
Service principal
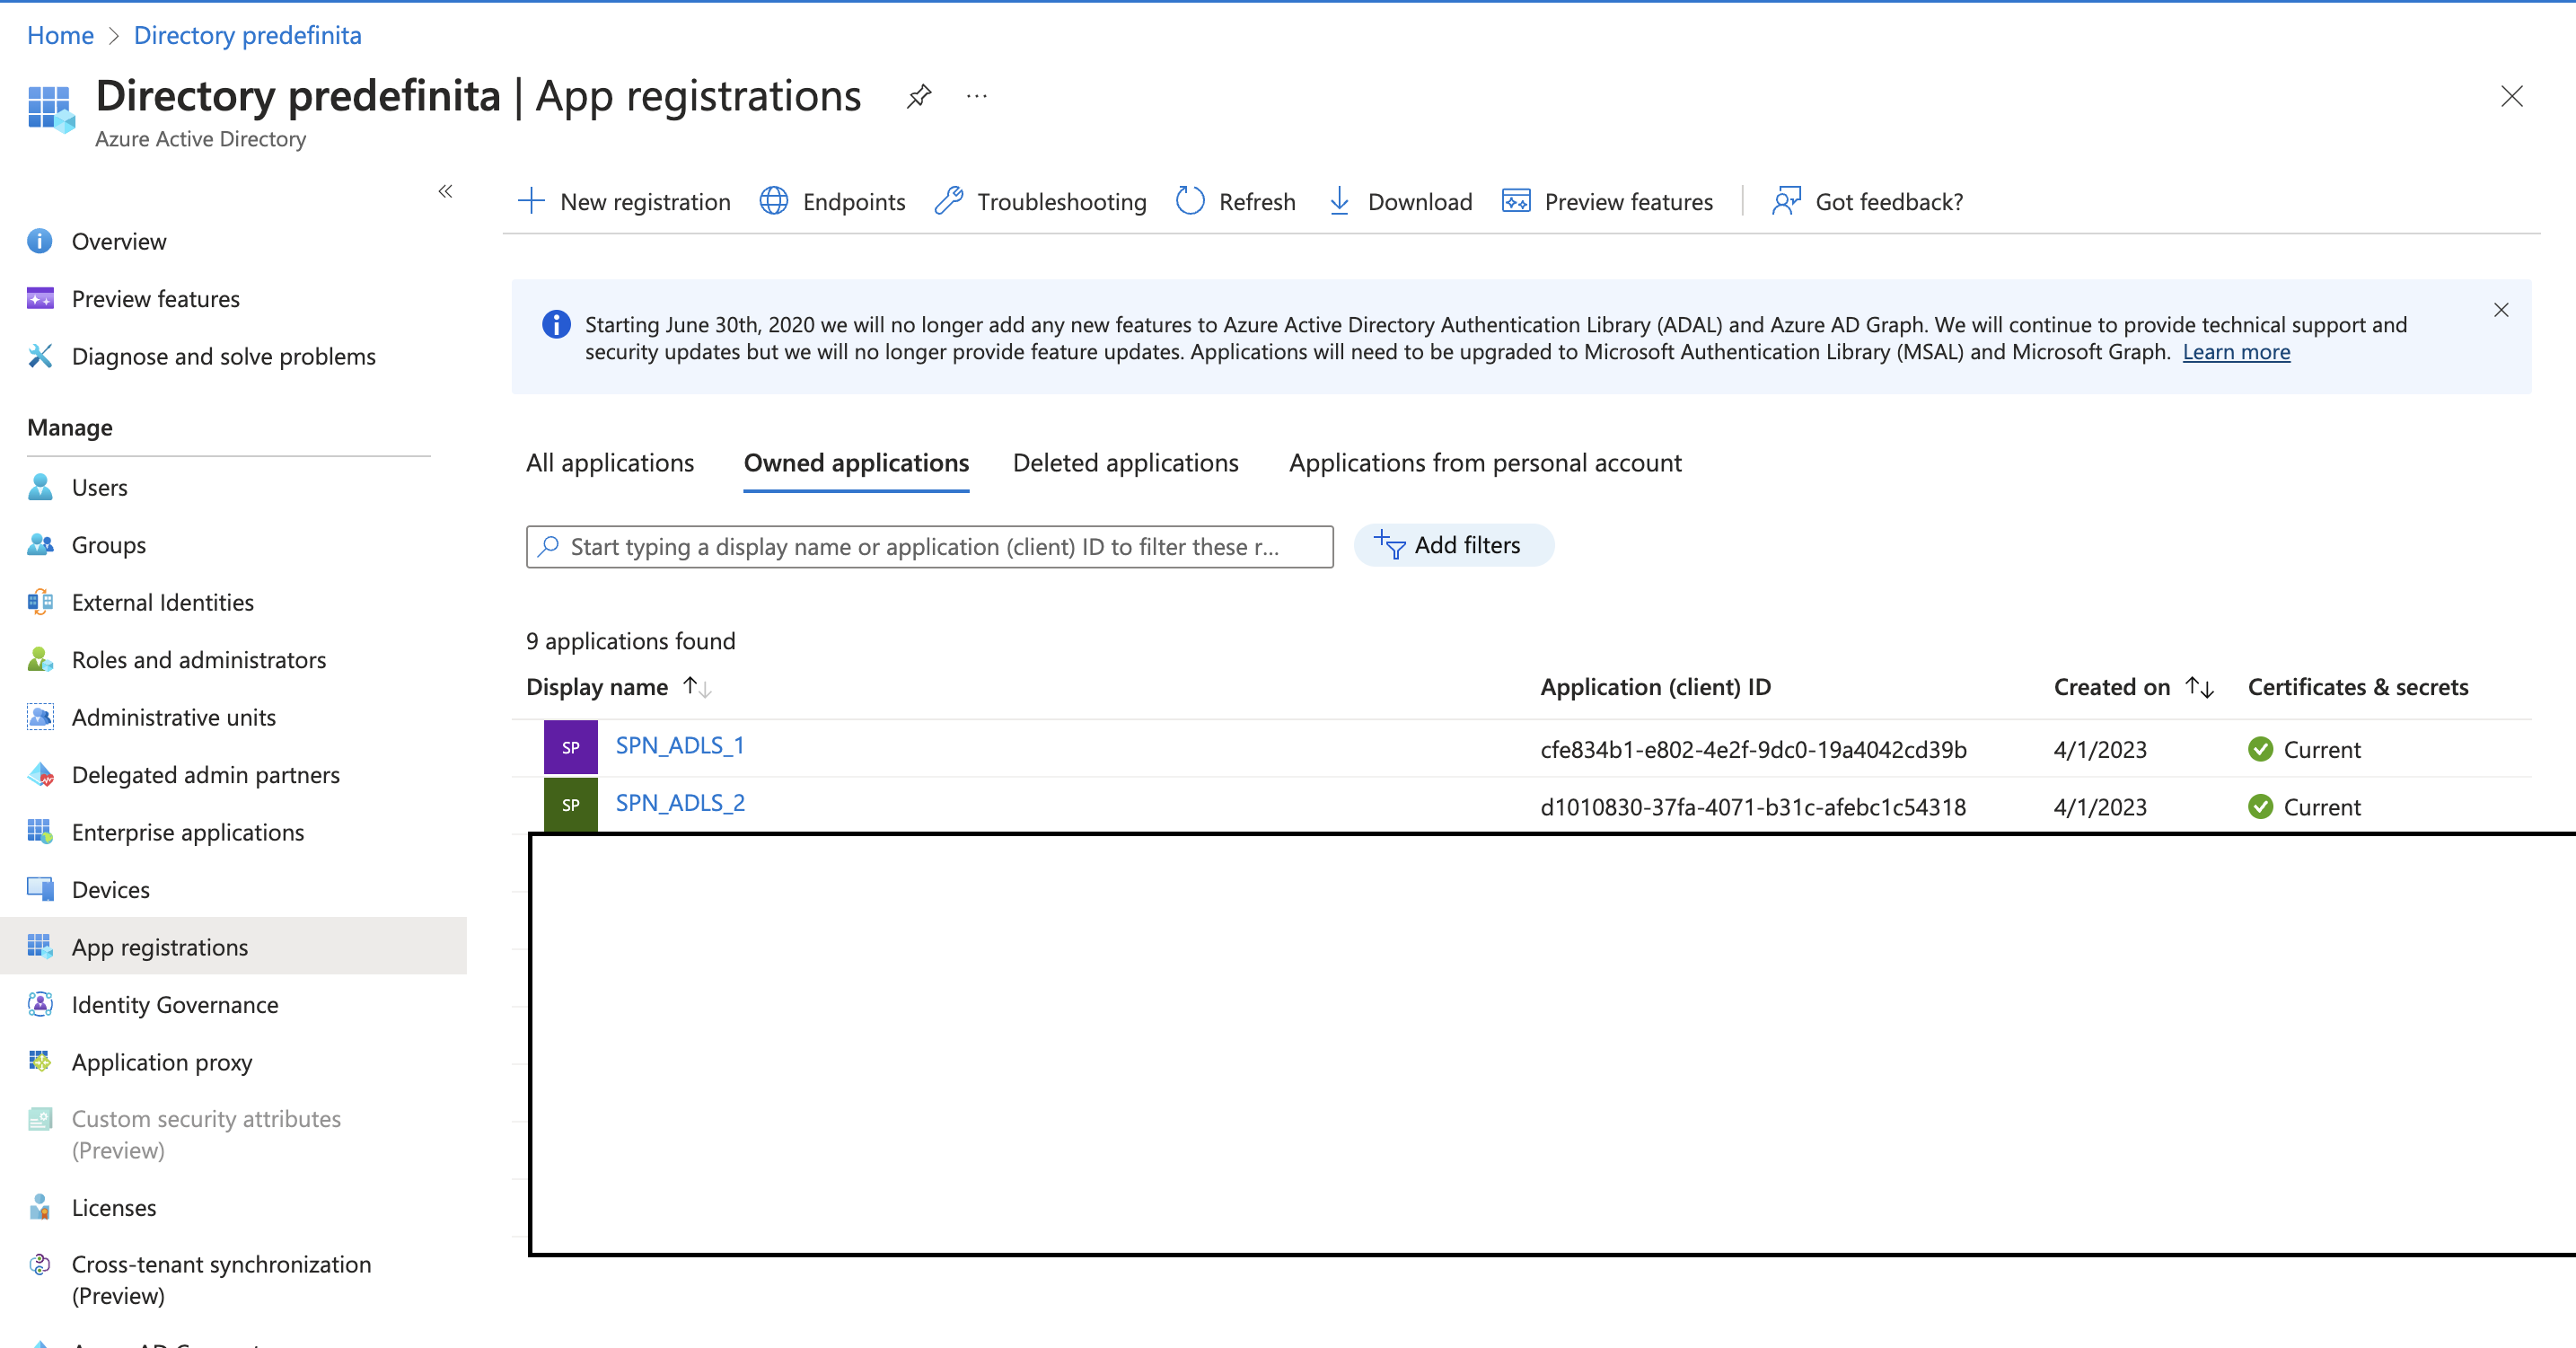
The first ingredient is to generate service principal in azure. Because we have two types of access (one for the group1 and another for group2) we have to create 2 service principal:
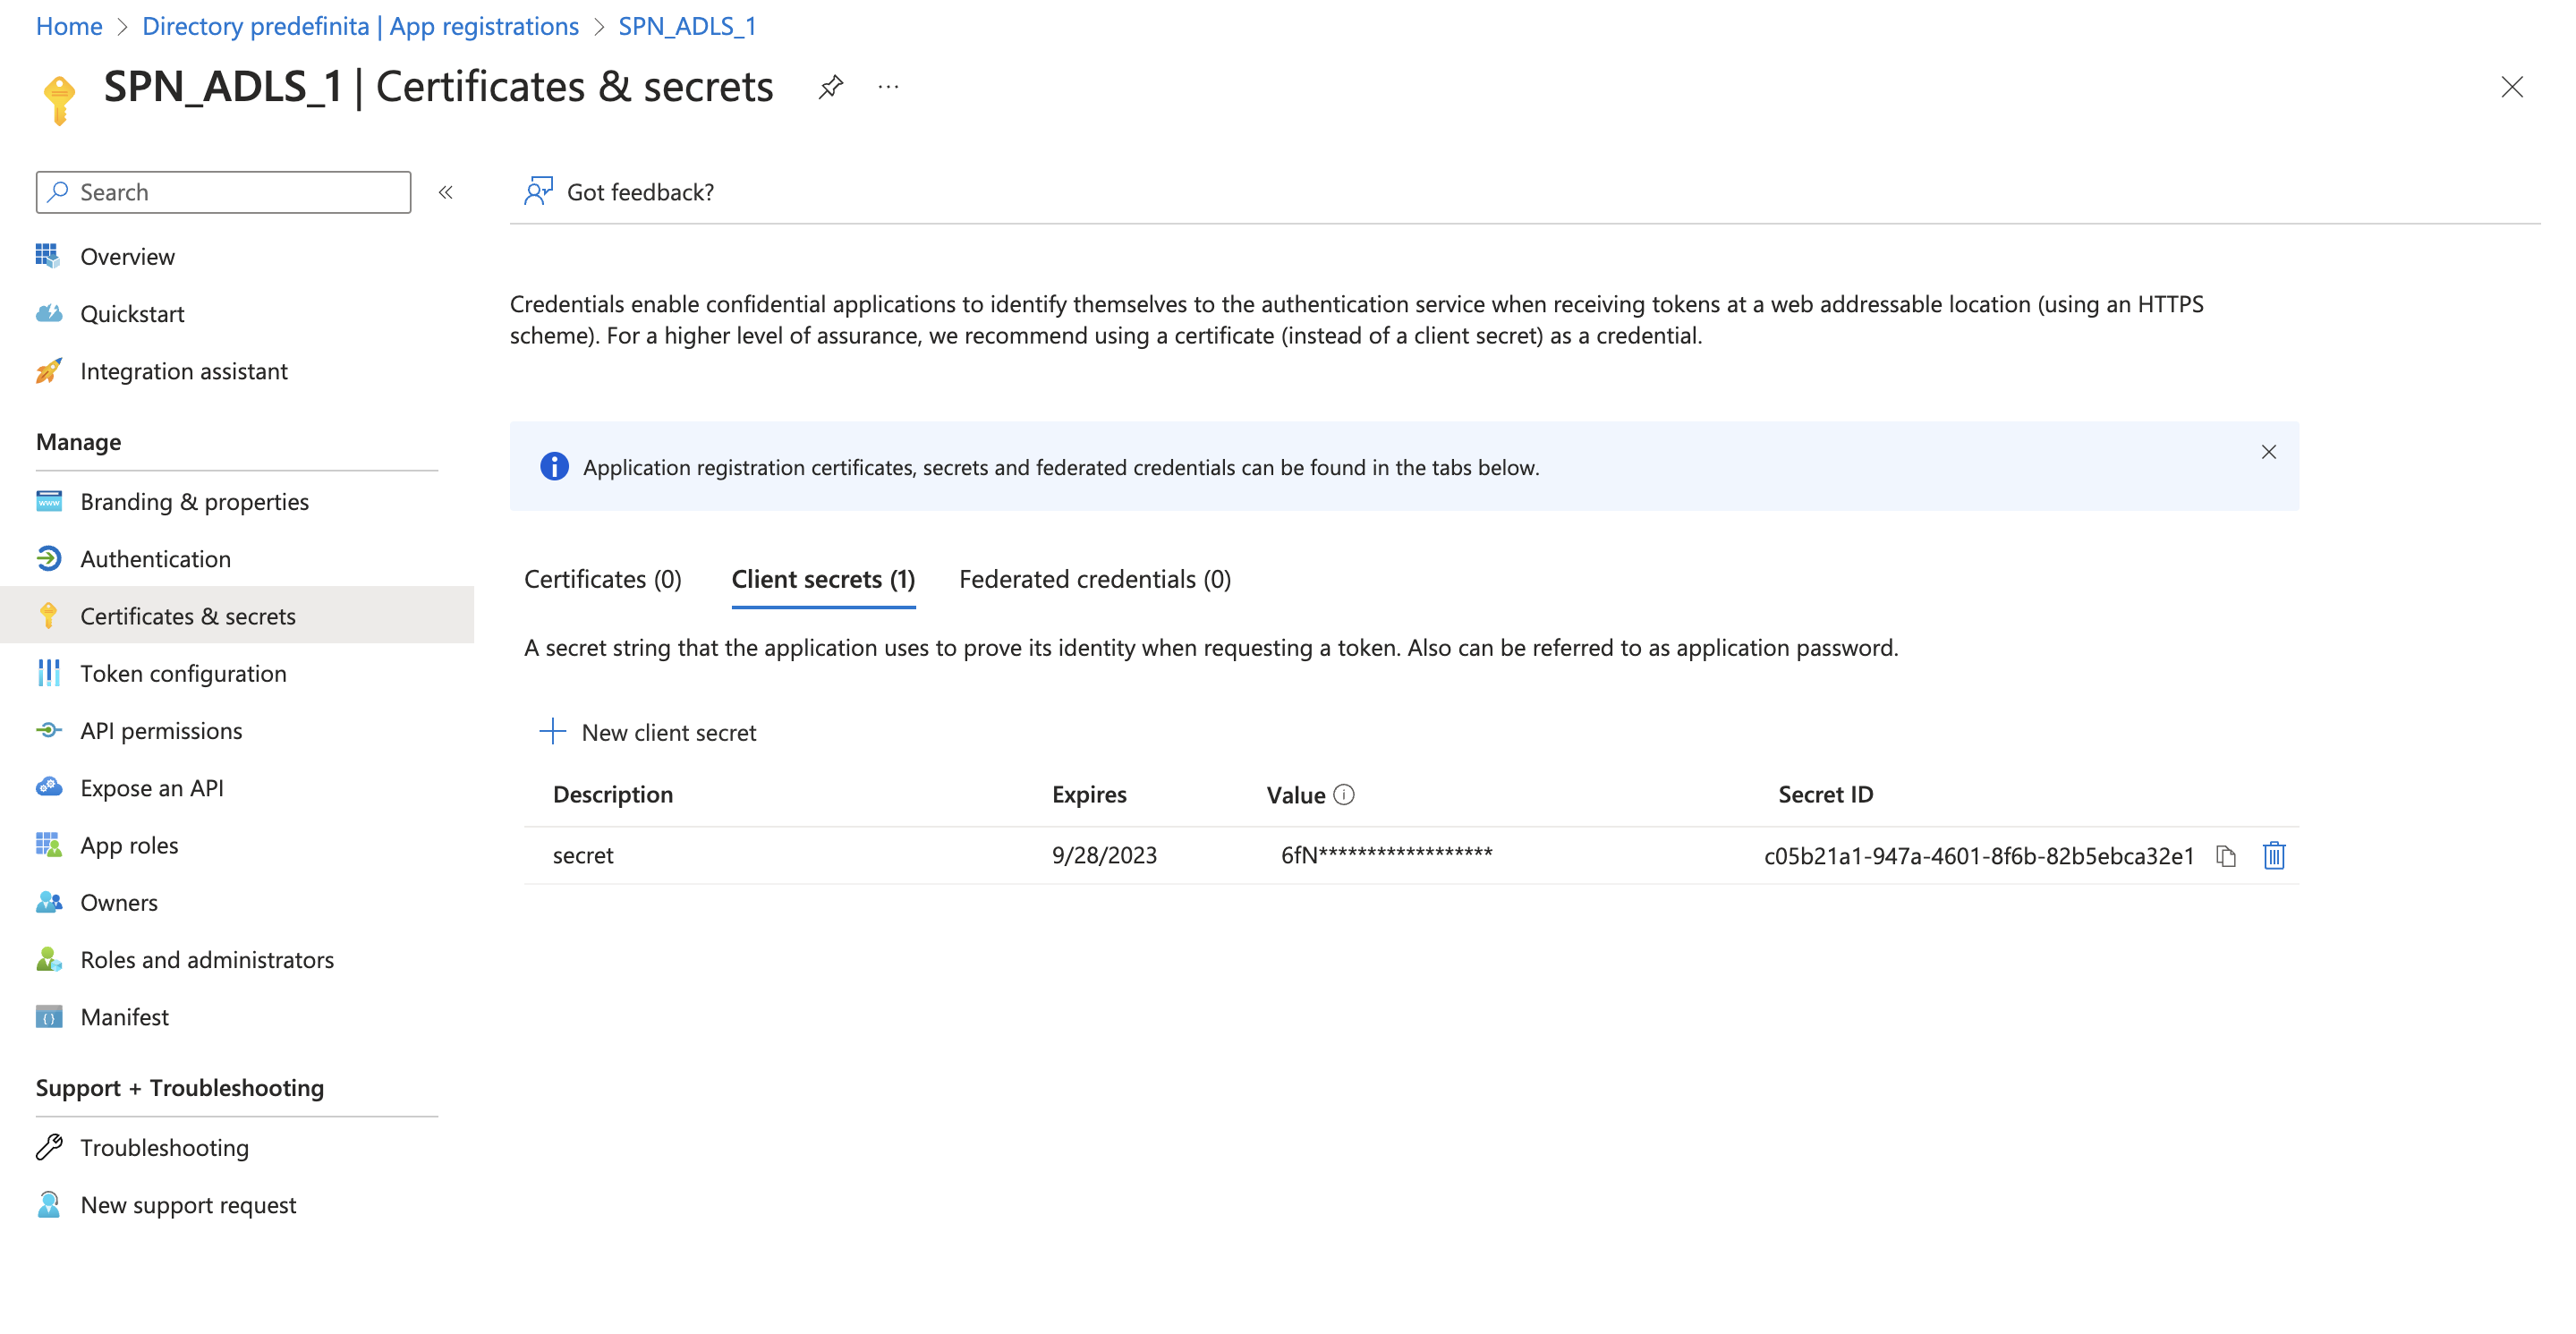
Also, for each service principal we need to create an authentication method. I used secret as authentication method an I generated for each SP a passphrase.
Secret of SPN_ADLS_1:
Now, we can login as the SP with azure CLI and test if the secret credential works. Let’s try with the SPN_ADLS_1:
- az login –service-principal -u <ID OF SP> -p <SECRET OF SP> –tenant <ACTIVE DIRECTORY TENANT ID>
Where:
- <ID OF SP>: Is the client ID of the service principal
- <SECRET OF SP>: Is the secret of the service principal (created in the previous step)
- <ACTIVE DIRECTORY TENANT ID>: Is the TENANT ID of your active directory. You can find it in the main page of the Active directory in azure.
After the login, we can retrieve the object id of the service principal, useful for the next step:
- az ad sp show –id <ID OF SP> –query id
ACL
In our scenario, we have 2 containers inside the ADLS multidatastorage:
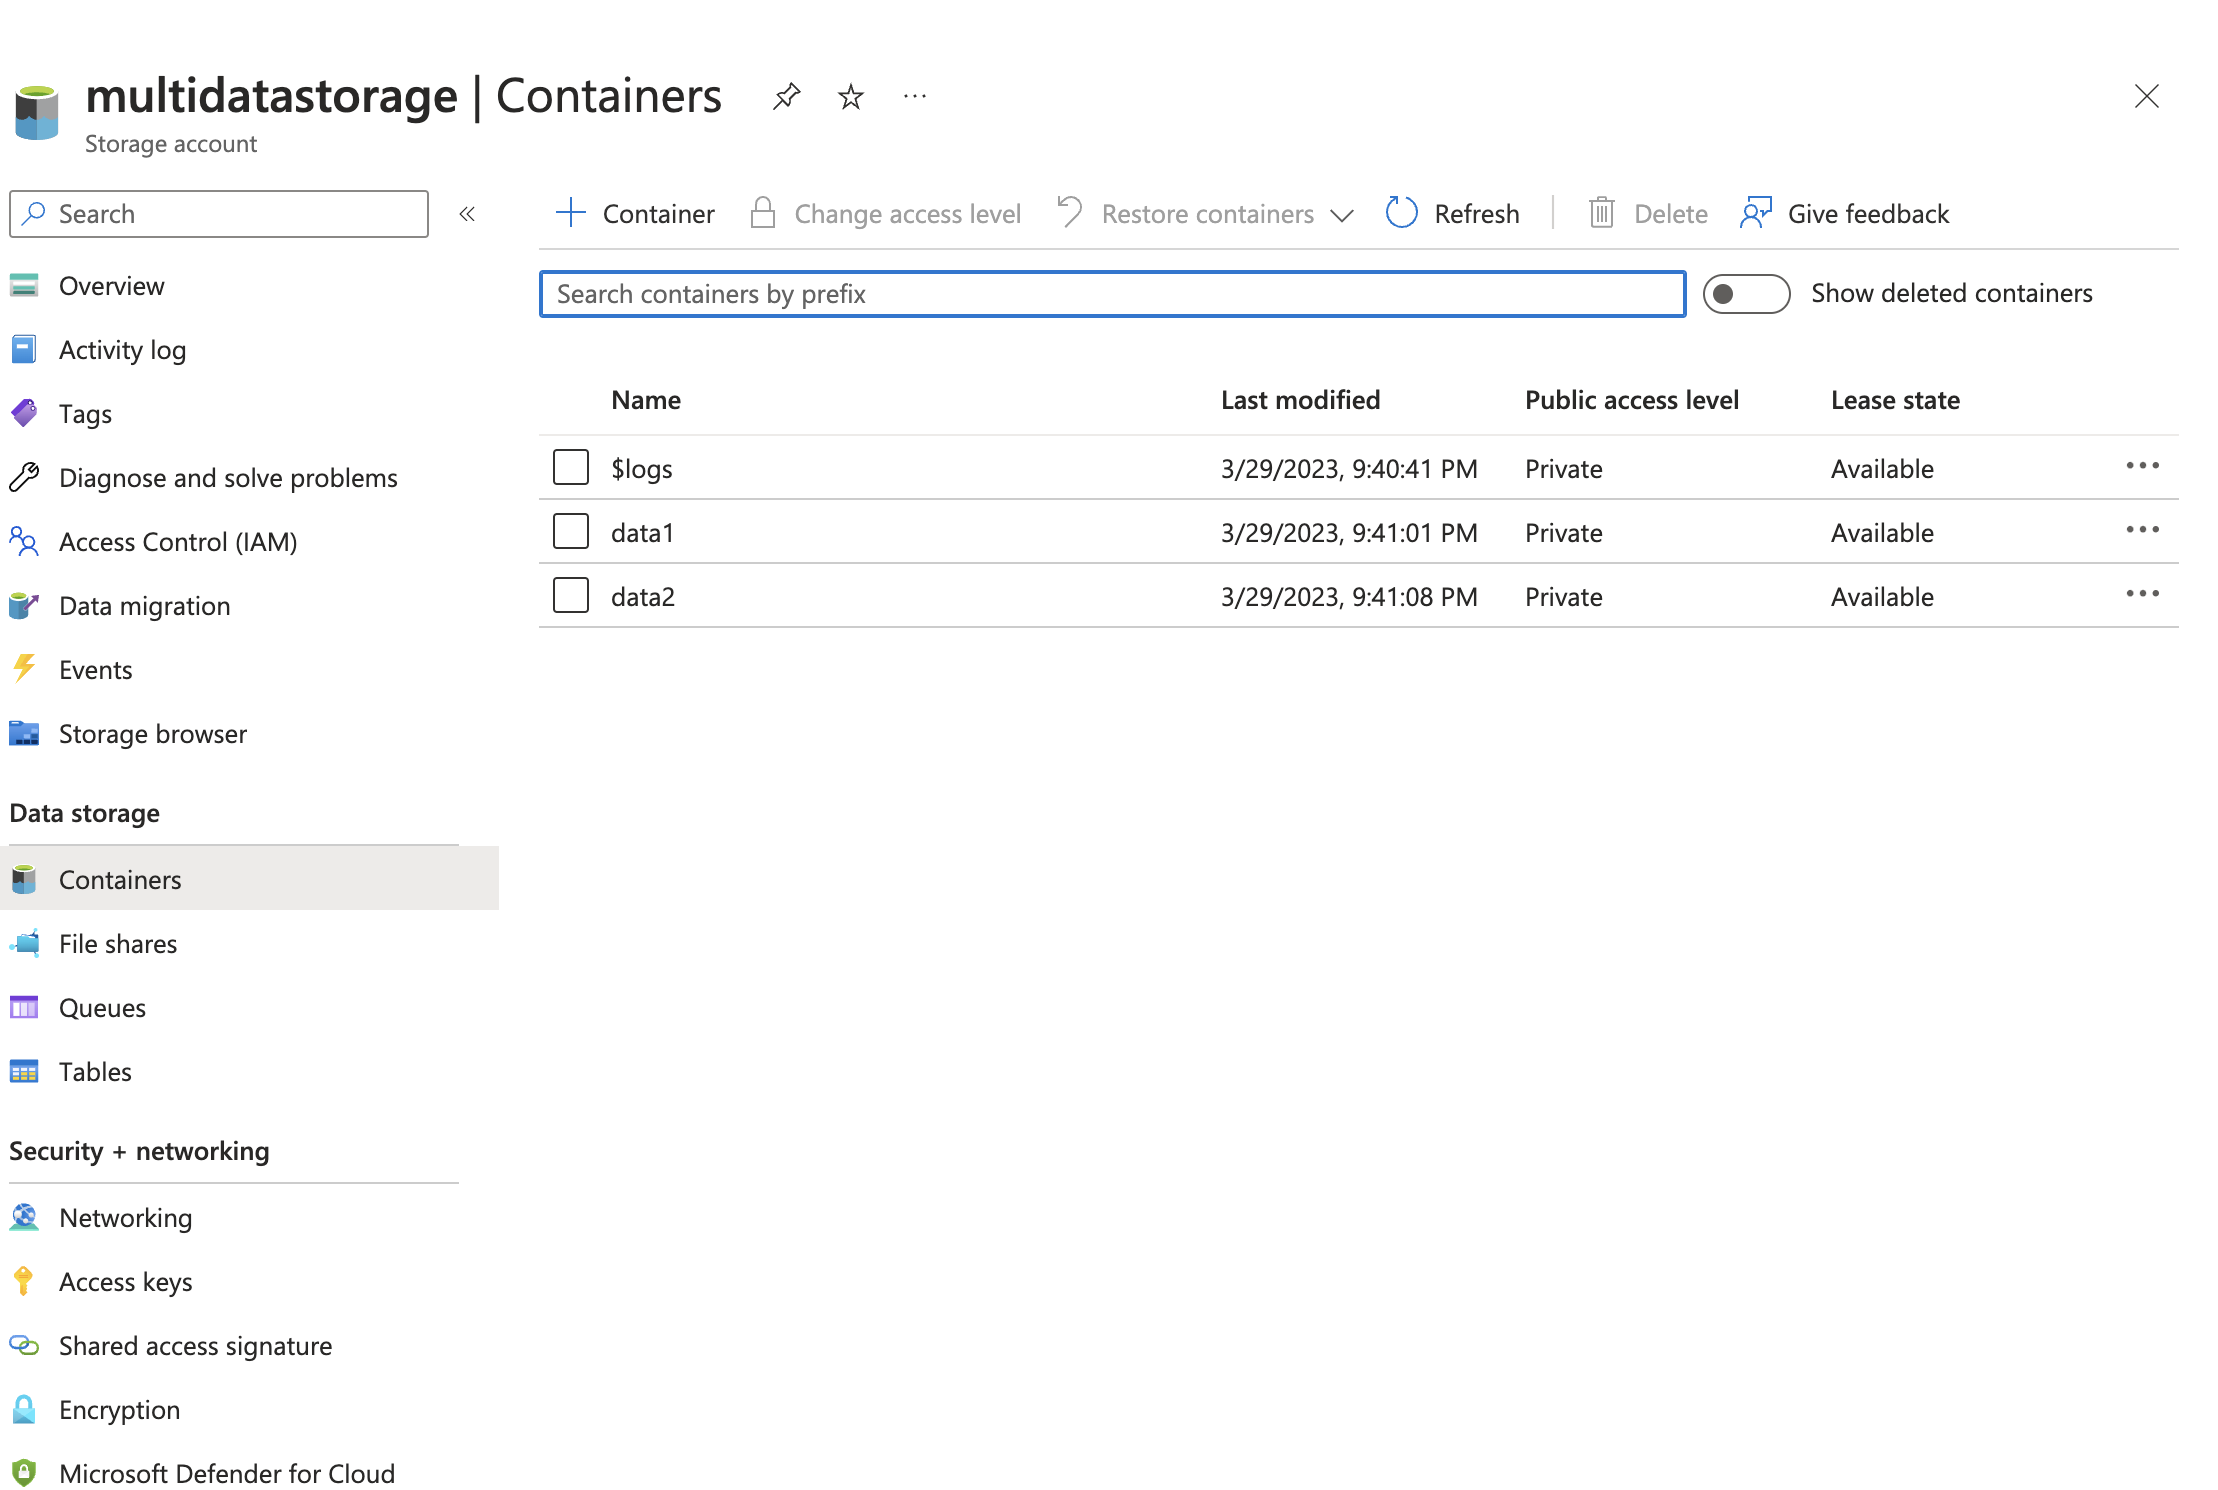
If we simply add the access using the RBAC to the service principal they will have the access to the entire data lake. So, in order to granularly give access to objects we need to use ACL. Access control list is avaliable for ADLS if the storage account has the hierarchical namespace featured enabled on it (follow the reference link to enable it).
Now, to grant acces to the SPN we can login with our account in azure cli (or an account that have the access to modify the ACL) and then update the ACL with the command:
- az storage fs access update-recursive –acl “user:<OBJECT ID OF SP>:r-x” -p . -f data1 –account-name multidatastorage –auth-mode login
Where <OBJECT ID OF SP> is the object ID of the SPN retrieved in the previous step. With the command az storage fs access update-recursive we grant to the SPN_ADLS_1 the read access to all the files and subfolder of the container data1. But, you can grant single file or single sub folder read or write access according to your needs. To double check the ACL of the container you can run **az storage fs access show ** to display the acl:
- az storage fs access show -p . -f data1 –account-name multidatastorage –auth-mode login
Or you can display the ACL in the azure portal:
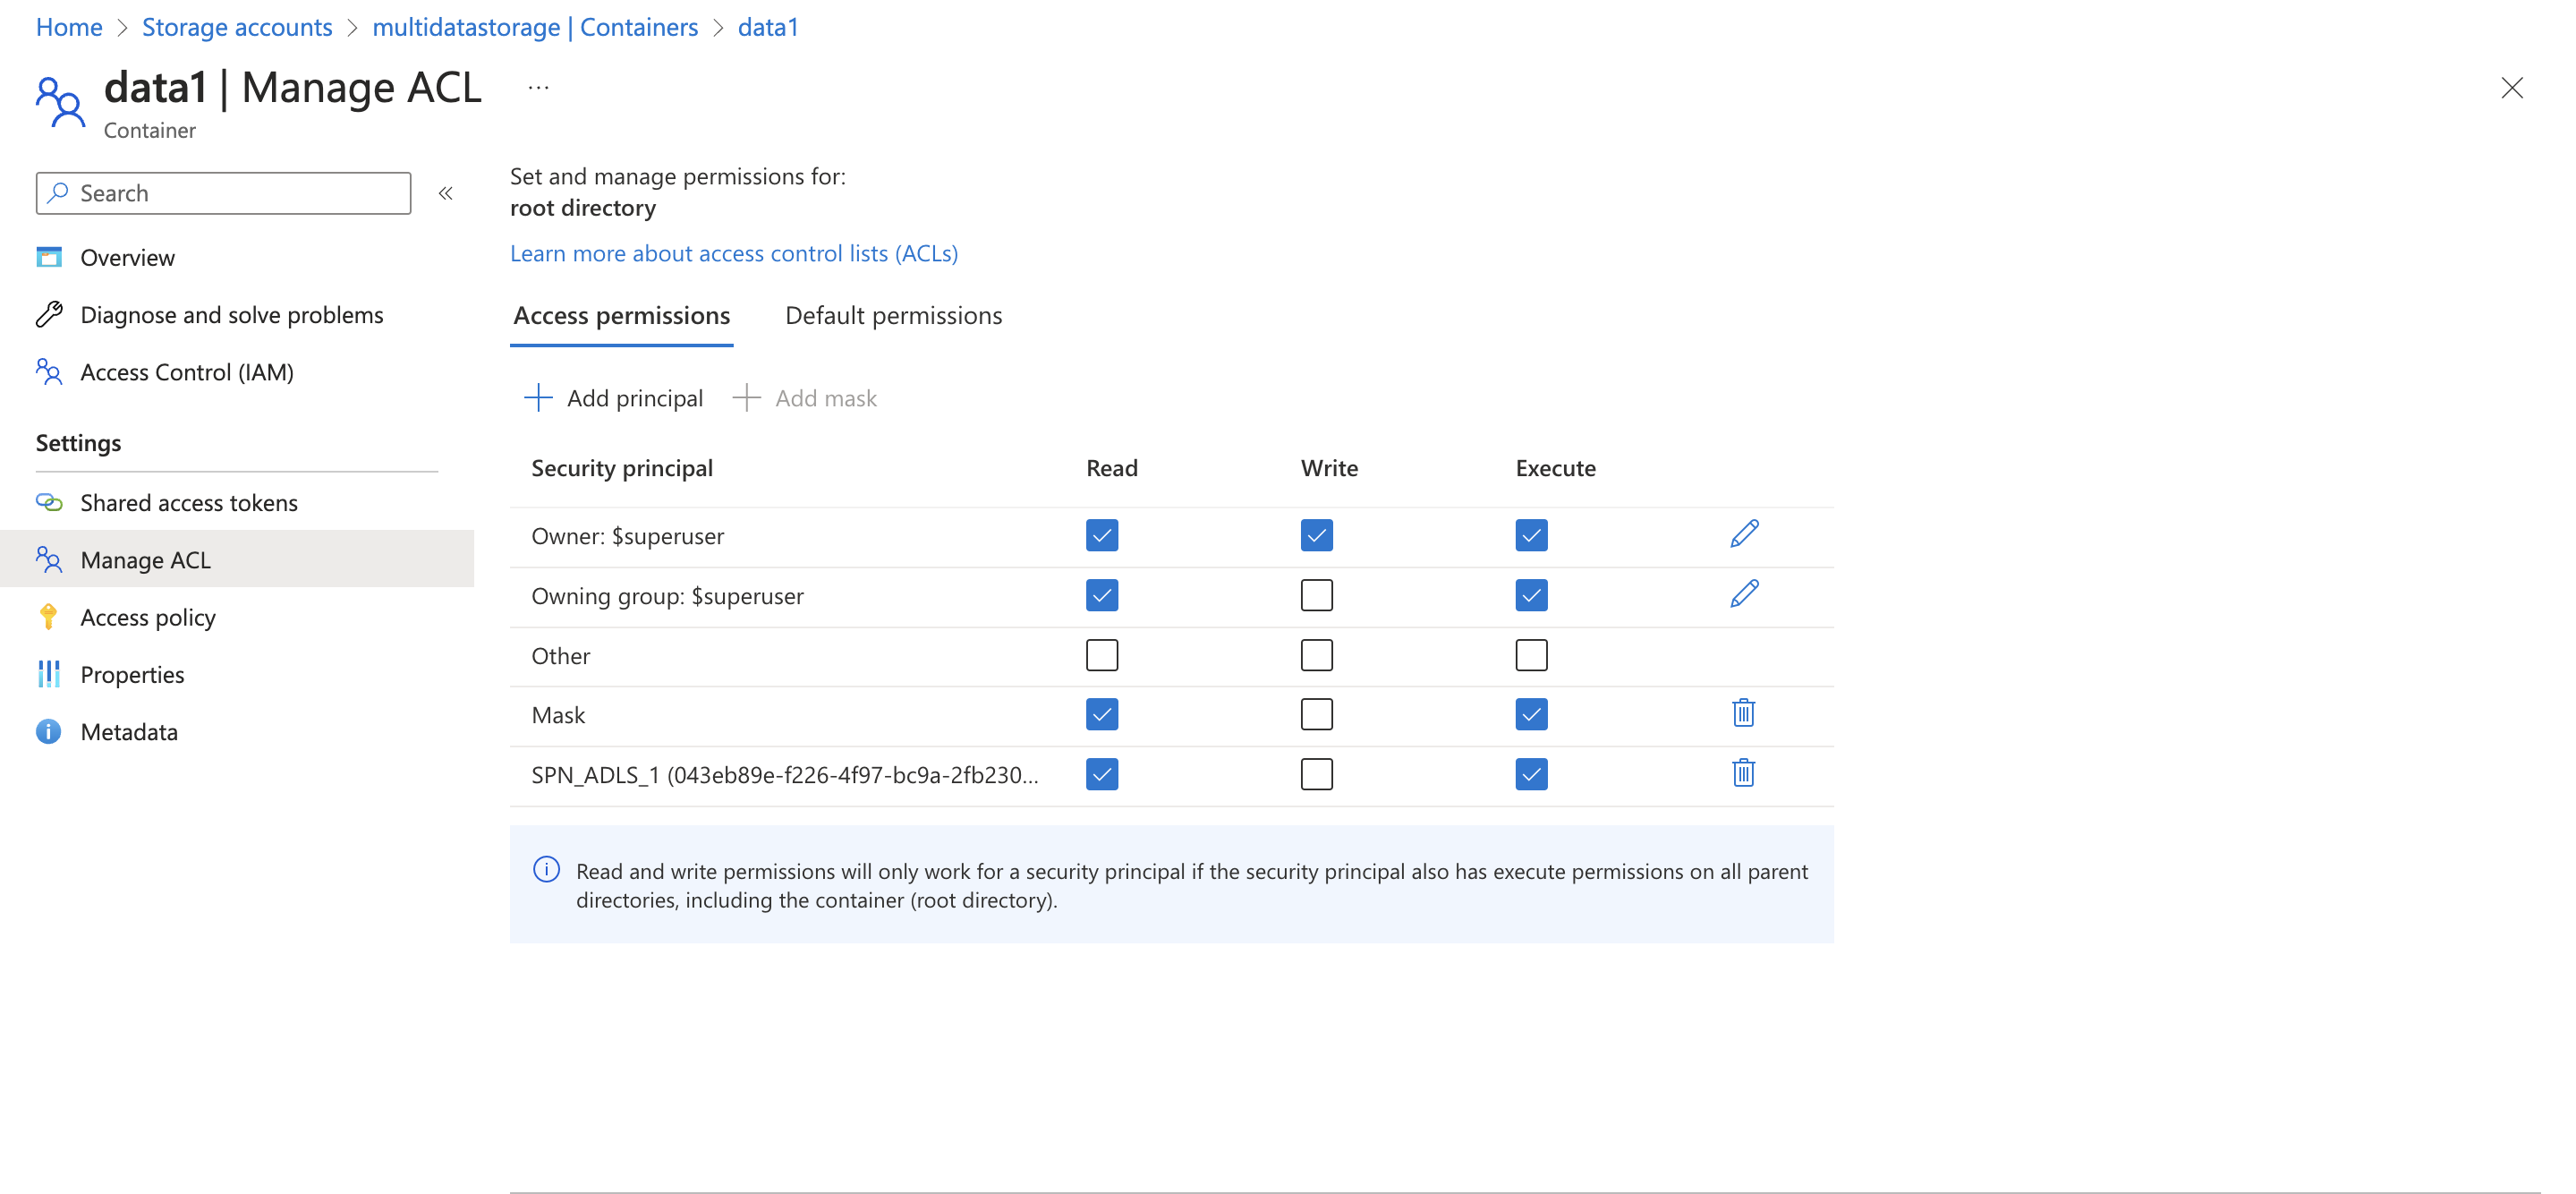
Now we can repeat the same steps for the SPN_ADLS_2 to grant the ACL for the container data2
Note: execute access is for list the contents of a directory. If you don’t grant execute access to a folder then the user cannot access the files of that folder (even if you grant read and write access).
Note2: the parameter -f (folder) of the command az storage fs correspond to the container name using azure blob storage.
Databricks
Now that we have all the ingredients we can configure databricks for grant the correct access to each groups. But first we need to create the groups:

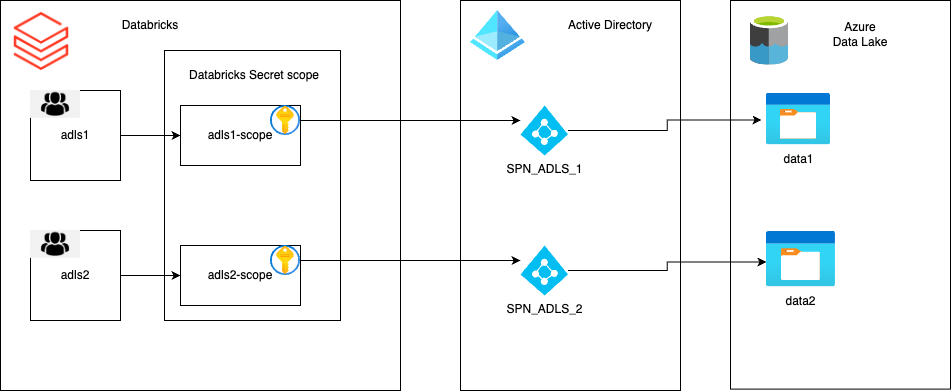
So, we have 2 groups: adls1 and adls2 and we want to grant:
to all the members of group adls1 access to container data1 but NOT to the container data2
to all the members of group adls2 access to container data2 but NOT to the container data1
By utilizing the service principal, we can access the data lake containers, but it’s crucial to attach the SP credentials to the corresponding groups. This enables the necessary permissions for authorized users to retrieve and analyze the data. Additionally, we can leverage Databricks Secret Scope and Databricks Secret Scope ACL to securely manage and share the SP credentials across different users and groups.
Secret Scope
We need two secret scope, one for each group. So let’s create the secret scope (Databricks-backed) using the databricks cli:
- databricks secrets create-scope –scope adls1-scope –scope-backend-type DATABRICKS
After that, we add two keys into the scope one containing the client id of the SP and another for the secret:
databricks secrets put –scope adls1-scope –key SPN-ADLS –string-value <ID OF SPN_ADLS_1>
databricks secrets put –scope adls1-scope –key SPN-ADLS-KEY –string-value “<SECRET OF SPN_ADLS_1>”
Then, we need to set the access of the secret permission. By default, scopes are created with MANAGE permission for the user who created the scope. After verifying that the credentials were configured correctly, we can share these credentials with the adls1 group. Grant the adls1 group read-only permission to these credentials by making the following request:
- databricks secrets put-acl –scope adls1-scope –principal adls1 –permission READ
Note: Your account must have the Premium Plan to assign granular permissions at any time after you create the scope.
You can double check the acl for the scope adls1-scope using the command:
- databricks secrets list-acls –scope adls1-scope
Moving on to the next step, we can now replicate the process for the second service principal and group.
Test access
Now that we have successfully configured Databricks, we can proceed to test the access in our notebook.
First we need to configure the access to the ADLS using OAuth 2.0 with the Azure AD service principal for authentication:
1
2
3
4
5
6
7
8
9
10
11
12
apprication_id = dbutils.secrets.get(scope="adls1-scope",key="SPN-ADLS")
service_credential = dbutils.secrets.get(scope="adls1-scope",key="SPN-ADLS-KEY")

storage_account = "multidatastorage"
tenant="<YOUR TENANT ID>"

spark.conf.set(f"fs.azure.account.auth.type.{storage_account}.dfs.core.windows.net", "OAuth")
spark.conf.set(f"fs.azure.account.oauth.provider.type.{storage_account}.dfs.core.windows.net", "org.apache.hadoop.fs.azurebfs.oauth2.ClientCredsTokenProvider")
spark.conf.set(f"fs.azure.account.oauth2.client.id.{storage_account}.dfs.core.windows.net", apprication_id)
spark.conf.set(f"fs.azure.account.oauth2.client.secret.{storage_account}.dfs.core.windows.net", service_credential)
spark.conf.set(f"fs.azure.account.oauth2.client.endpoint.{storage_account}.dfs.core.windows.net", f"https://login.microsoftonline.com/{tenant}/oauth2/token")
And now we can test the access by trying to list the files inside the container.
1
2
container_name = "data1"
dbutils.fs.ls(f"abfss://{container_name}@{storage_account}.dfs.core.windows.net/")
In conclusion, with the successful configuration of Service Principal, Azure Data Lake Storage ACL and Databricks Scope, we have effectively implemented a secure and controlled data access mechanism for our users. As demonstrated, users belonging to group1 can now access only the data container data1, as their Service Principal Name (SPN_ADLS_1) is restricted to that specific container. This provides a robust security layer for data access, ensuring that unauthorized users are unable to access to unauthorized data.
Final thoughts
While the configuration of Service Principal and Access Control Lists enables granular access to data within Azure Data Lake Storage, it must be acknowledged that this process can be complex and requires the management of multiple Service Principal and ACLs on the secret scope and data lake. However, the benefits of this configuration, in terms of providing a secure and controlled environment for data access, far outweigh the complexity. By implementing these best practices, organizations can ensure the security of their data and mitigate the risks associated with unauthorized data access.
Remember, with great power comes great responsibility and a lot of complicated configuration steps!
Reference link
For more details check out these links: